Growing new plants from cuttings is one of the most rewarding parts of indoor plant care. It allows you to expand your plant collection, save a struggling plant, share your favourite varieties with friends and watch roots develop from a single stem. Water propagation is especially popular because it is simple, visual and beginner-friendly. You can see the roots growing day by day and understand exactly how your cutting is progressing.


But successful water propagation is not only about placing a stem in a glass of water and waiting. The health of the mother plant, the quality of the cutting, the position of the node, the cleanliness of the water and the transition into soil all play an important role. A cutting can grow roots in water, but it still needs the right care to become a strong, independent plant.
This guide explains how to propagate houseplant cuttings in water, which plants are suitable, how to take a healthy cutting, how to care for it while roots develop and how to move it into a proper substrate when it is ready.

What is water propagation?
Water propagation is a method of growing roots from a plant cutting by placing part of the stem in water. Instead of planting the cutting directly into soil, the node is kept submerged until new roots begin to form.
A node is the part of the stem where new growth can emerge. It may look like a small bump, joint or thicker point on the stem. In many houseplants, roots can only grow from nodes, which means a cutting without a node will usually not develop into a new plant.
Water propagation is often used for popular indoor plants such as Monstera, Philodendron, Pothos, Syngonium, Tradescantia, Fittonia and some Hoyas. These plants can form roots relatively easily in water when the cutting is healthy and the conditions are right.
The biggest advantage of water propagation is visibility. Because the roots are visible through the glass, it is easy to monitor progress, spot problems early and learn how the plant responds.

Why propagate plants in water?
Water propagation is ideal for beginners because it is simple and does not require many materials. A clean glass, fresh water, sharp scissors and a healthy plant are often enough to start.
It is also useful when you want to:
- Create a new plant from a favourite houseplant
- Save a healthy part of a damaged or overwatered plant
- Encourage roots before moving a cutting into soil
- Observe root development clearly
- Multiply trailing or climbing plants
- Share cuttings with other plant lovers
Water propagation is not always the fastest method, and not every plant enjoys it, but for many common houseplants it is a practical and reliable way to start new growth.


When is the best time to take cuttings?
The best time to take cuttings is during the active growing season, usually spring and summer. During this period, plants receive more light, temperatures are warmer and growth is naturally stronger. Cuttings taken during this time often root faster and recover better.
Autumn and winter propagation is possible, especially under grow lights, but it may be slower. Low light, cold windowsills and dry indoor air can all delay root growth. If you propagate during darker months, place the cutting in bright indirect light and keep the temperature stable.
A healthy mother plant is also important. Avoid taking cuttings from a plant that is severely stressed, dehydrated, pest-infested or actively rotting. A strong cutting begins with a strong parent plant.
Which plants can be propagated in water?
Many tropical houseplants can root successfully in water. Some of the easiest options include:
- Monstera
- Philodendron
- Pothos
- Syngonium
- Tradescantia
- Fittonia
- Scindapsus
- Peperomia varieties with suitable stem sections
- Some Hoya varieties
The best candidates are plants with visible nodes and strong stems. Plants with woody stems, very sensitive roots or desert growth habits may not respond as well to water propagation. Cacti and many succulents are usually better propagated by leaf, stem drying or direct planting methods rather than long-term water rooting.
Before taking a cutting, identify how your plant grows. A trailing vine, climbing aroid or node-forming tropical plant is usually a good choice for water propagation.
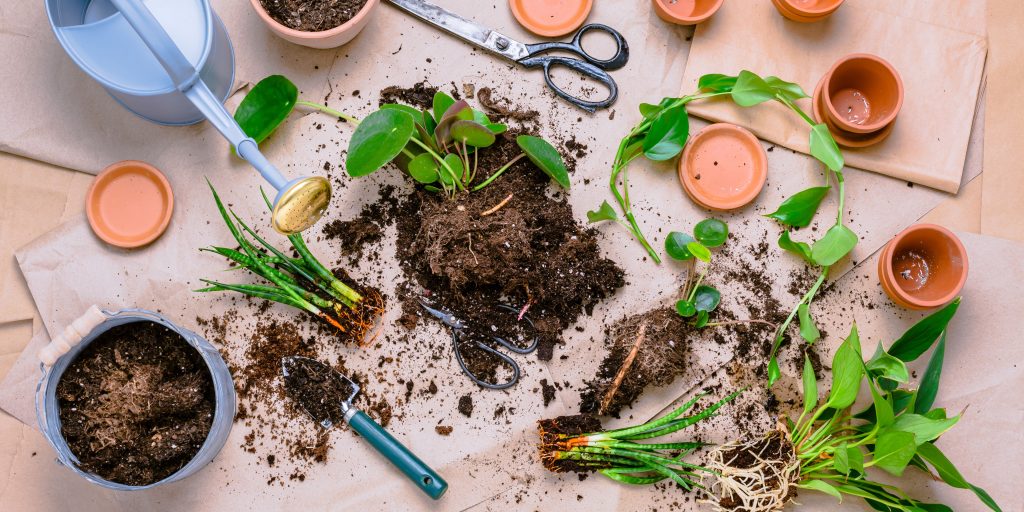
What you need before you start
Prepare everything before cutting the plant. This keeps the process clean and reduces stress for both the cutting and the mother plant.
You will need:
- A healthy plant
- Sharp, clean scissors or pruning shears
- A clean glass, jar or vase
- Room-temperature water
- Optional: plant label
- Optional: perlite or sphagnum moss for later transition
- Optional: PlantNest substrate for repotting after roots develop
Clean tools are important. Dirty scissors can introduce bacteria into the cut, which may increase the chance of rot. Wash or disinfect your tools before making the cut.
A transparent container is useful because it allows you to see the roots and water quality. However, if algae becomes a problem, a darker container can help reduce light exposure to the water.
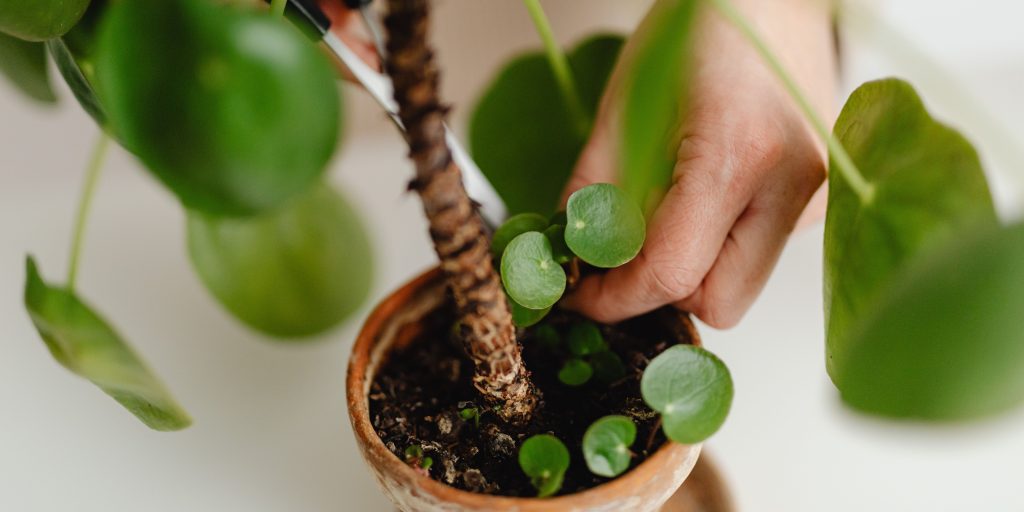
How to take a healthy cutting
Look for a strong section of stem with at least one node. Ideally, the cutting should also have one or more healthy leaves. The leaf provides energy, while the node provides the ability to grow roots.
Cut just below the node using clean scissors. The cut should be neat, not crushed. A damaged or bruised stem may rot more easily.
Remove any lower leaves that would sit below the waterline. Leaves left in water can decay and make the water dirty. Only the node and lower part of the stem should be submerged.
If the cutting is very large, it may struggle to support all its leaves before roots develop. In that case, choose a smaller section or remove one leaf to reduce stress. A balanced cutting is easier to root than an oversized one.
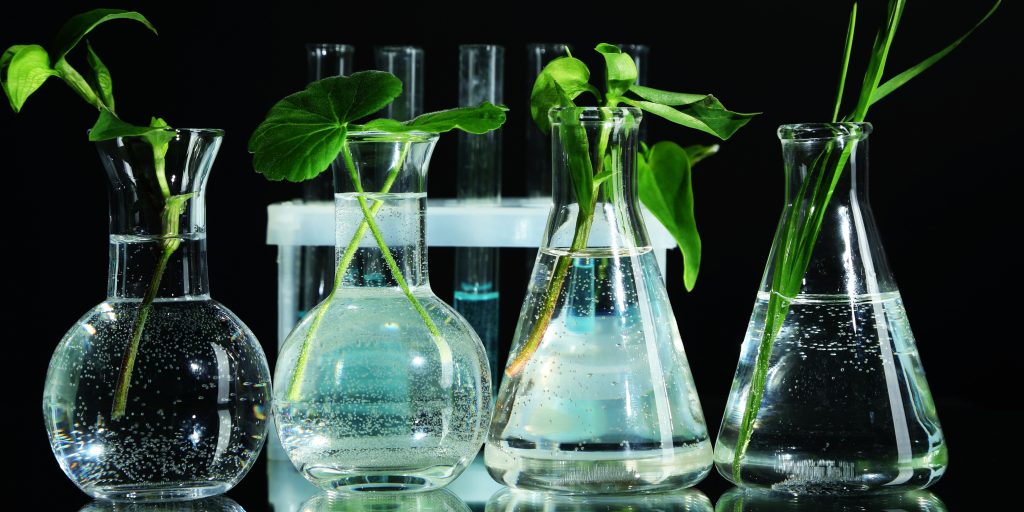
How to place the cutting in water
Fill a clean glass or jar with room-temperature water. Place the cutting inside so that the node is underwater, but the leaves remain above the surface.
The node must stay submerged because this is where roots will usually form. If the water level drops below the node, root development may slow down or stop.
Place the container in bright, indirect light. Avoid harsh direct sun, especially through glass, because it can heat the water and stress the cutting. A bright shelf, windowsill with filtered light or spot near a grow light works well.
Warmth helps, but the water should not become hot. A stable indoor temperature is better than sudden changes.
How often should you change the water?
Fresh water helps keep the cutting clean and oxygenated. Change the water whenever it becomes cloudy, develops an unpleasant smell or shows visible debris. Many plant owners refresh the water every few days to keep conditions clean.
When changing the water, rinse the container if needed and inspect the cutting. Check whether the stem feels firm and whether roots are beginning to appear. If the lower part of the cutting becomes soft, black or mushy, remove the affected part if possible and restart with a clean cut above the damaged area.
Keeping the water clean is one of the simplest ways to reduce the risk of rot.
How long does rooting take?
Rooting time depends on the plant species, season, light, temperature and cutting quality. Some plants begin showing roots within one or two weeks. Others may take several weeks or longer.
Do not panic if roots do not appear immediately. As long as the cutting remains firm, the leaves are not collapsing and the water stays clean, the cutting may still be healthy.
Signs of progress include:
- Small white bumps near the node
- Tiny roots emerging from the stem
- New leaf growth
- A firm and hydrated stem
- Stable leaves with no major yellowing
Once roots are a few centimetres long and beginning to branch, the cutting is usually ready to move into substrate.
When should you move a water cutting into soil?
A common mistake is leaving cuttings in water for too long. Water roots are adapted to a water environment. If they grow very long and delicate, the transition into soil can become more stressful.
Move the cutting when it has several healthy roots, ideally with some branching. The roots should be long enough to anchor the plant in soil but not so long that they tangle heavily inside the jar.
The transition from water to soil is an important step. A cutting that rooted successfully in water still needs the right substrate to continue growing. Soil that is too dense can suffocate new roots. Soil that dries too quickly can stress roots that developed in water.
This is where a high-quality, airy and well-draining substrate becomes essential.
How to transfer a water cutting into substrate
Choose a small pot with drainage holes. Do not use a pot that is too large. A small root system in a large volume of wet soil can increase the risk of overwatering.
Fill part of the pot with a fresh, suitable substrate. Place the rooted cutting into the pot and gently spread the roots downward. Add substrate around the roots and lightly settle it with your fingers. Do not press too hard. Young roots need oxygen and should not be compacted.
Water the substrate thoroughly after planting. Let excess water drain away completely. During the first weeks, keep the substrate lightly moist while the roots adapt. Avoid letting the mix become bone dry immediately after transfer.
Place the new plant in bright, indirect light and avoid strong direct sun until it is established.
Choosing the right substrate after water propagation
The right substrate depends on the plant.
For common indoor plants, a balanced universal mix can work well. PlantNest Universal Soil Mix is designed to be airy and well-draining, with pine bark and perlite supporting moisture balance and root aeration.
For aroids such as Monstera, Philodendron, Anthurium, Alocasia and Syngonium, a chunkier mix is often better. These plants benefit from oxygen around the roots and a structure that prevents waterlogging. PlantNest Aroid Soil Mix is created for this purpose, combining breathable and structured components that support tropical root systems.
For Monsteras and Philodendrons specifically, a substrate with pine bark, perlite, pumice and zeolite can help maintain airflow, drainage and long-term stability.
For succulents and cacti, avoid moisture-heavy mixes. These plants need fast drainage and a more mineral structure.
The goal after water propagation is simple: give the new roots oxygen, moisture balance and support.
Can you use perlite for cuttings?
Yes, perlite can be a useful material for propagation. Some plant owners use it alone or combine it with water, sphagnum moss or substrate to create a cleaner, more breathable rooting environment.
Perlite helps maintain airflow and reduces the chance of a heavy, waterlogged medium around young roots. It is especially useful when transitioning cuttings from water into a more structured environment. Because it is lightweight and porous, it supports oxygen movement while helping moisture stay available.
PlantNest Perlite can be used for rooting cuttings, improving substrate structure and supporting healthy root development. It is a practical option for growers who want more control than plain water propagation but still want a simple and clean setup.
Water propagation vs. soil propagation
Water propagation and soil propagation both have advantages.
Water propagation allows you to watch roots develop. It is beginner-friendly and satisfying because progress is visible. It is especially useful for plants that root easily from nodes.
Soil propagation places the cutting directly into its future growing medium. This can reduce the stress of moving from water roots to soil roots later. However, beginners may find it harder because roots are hidden and moisture must be managed carefully.
There is no single perfect method for every plant. Water propagation is excellent for learning and for many tropical houseplants. Soil or perlite propagation may be better for plants that dislike water rooting or for growers who want stronger adaptation from the beginning.
Common water propagation mistakes
One of the most common mistakes is placing a cutting in water without a node. Leaves alone may stay fresh for a while, but they usually cannot produce a new plant without a growth point.
Another mistake is allowing leaves to sit in the water. Submerged leaves rot quickly and can contaminate the water.
Dirty containers can also cause problems. Always start with a clean jar or glass.
Too little light slows root growth, while direct sun can overheat the water and damage the cutting. Bright, indirect light is the safest choice.
Waiting too long before transferring to soil can also make adaptation harder. Once the roots are developed enough, move the cutting into a suitable substrate and care for it gently.
How to prevent rot during water propagation
Rot is usually caused by poor hygiene, damaged stems, submerged leaves, stagnant water or weak cuttings.
To reduce the risk:
- Use clean tools
- Choose healthy stems
- Cut below a node
- Remove lower leaves
- Keep only the node and stem in water
- Refresh the water regularly
- Keep the container clean
- Avoid direct hot sunlight
- Remove any mushy tissue immediately
If a cutting rots completely, discard it and start again with a healthier piece. Propagation always includes some trial and error, even for experienced growers.
Aftercare for newly potted cuttings
Once the cutting is planted in substrate, it needs gentle care. The roots are still young and adjusting to a new environment.
Keep the soil lightly moist at first, but never soggy. Use a pot with drainage holes and let excess water escape. Bright, indirect light is best. Avoid heavy fertilizing immediately after potting. Give the plant time to settle before encouraging strong new growth.
Some leaf drooping is normal after transfer. The plant is adapting from water to soil. If the substrate is airy, moisture-balanced and not compacted, the roots have a much better chance of establishing successfully.
Build strong roots from the start
Water propagation is a beautiful way to grow new plants, but the goal is not only to produce roots in water. The real goal is to create a healthy plant that can continue growing after it leaves the jar.
That means choosing the right cutting, keeping the water clean, providing enough light and transferring the plant into a quality substrate at the right time.
PlantNest substrates are designed around the needs of healthy roots: fast drainage, optimal moisture balance, airy structure and strong support. These qualities are especially important when young cuttings move from water into soil.
A strong plant starts with strong roots. And every new plant deserves the right foundation from the beginning.
Final thoughts
Water propagation is simple, but successful propagation depends on the details. A good cutting needs a node, clean water, bright indirect light and patience. Once roots develop, the new plant needs an airy, well-draining substrate that supports the transition from water to soil.
Whether you are propagating Monstera, Philodendron, Pothos, Syngonium or another favourite houseplant, the same principle applies: protect the roots, keep the environment clean and give the plant a balanced foundation for future growth.
With the right care and the right substrate, a small cutting can become a strong, thriving houseplant.